Sunday, June 28, 2009
Simple Sourdough Bread, Real Simple perfect for me!
There are nuances and feel of the dough an pastry that I just would have enjoyed getting the experience on. My whole education of baking was about 4 days, between portion control and special dietary requirements and allergic reactions....
You can feel the correct elasticity of the dough, you can see that it has risen sufficiently to put in the oven.
You know how to roll out the dough just right, or you know and are not afraid to tackle stretching dough in order to make strudel......
Over the years I have been somewhat successful at making bread, but I do not have the patience to make it turn out to be consistent, time over time over time.
Until I found this one recipe.
This is so simple that it would really take somebody real special to screw it up. But it did take me two times to get it right....or shall I say to get it perfect!
There are only 3 ingredients, not counting water...how simple can you get?
And you don't have to kneed it or process it in any way!
Stuff you will need.......get it? Knead!......
17 oz of bread flour
2 1/2 teaspoons of Kosher Salt
1/4 teaspoon of active dry yeast
3 - 4 tablespoons cornmeal ( optional )
12 oz water.
Get a big bowl and toss in 17 oz of flour. By weight.
add the salt and yeast, and mix to homogenize
add the water and stir into a dough.
If need be you can add just a tad, like a teaspoon or two of water if you need to incorporate all the flour into one mass. This may or not be required depending on your moisture content of your flour. Humid climates may require less water. The whole result should be a dough ball, just wet enough to have picked up all the dry flour. If you still have some flour in the bowl with the 12 oz of water, just a tiny bit, to pick it all up. The other way to accomplish the same, is to hold back a little of the flour and add it at the end. It is quite easy and don't be intimidated by it! The end result is worth it!
After you have made a ball and there is no more dry flour to be absorbed, remove the mixing spoon and cover the bowl with some plastic wrap.
Set aside in a draft free or semi warm place. Room temperature ( 70-95 )
Wait
Wait
Wait
Wait
after 18 hours, yep 18 hours, remove the plastic and flour your hands and punch down the down, flour the dough as you are punching it down , using the flour will allow your hands not to become too sticky, and let it rest for about 15 to 20 minutes.
After you come back, flour your hands remove the dough from the bowl and fold it down on itself folding the seam to be on the bottom , sort of making a nice dough ball while squeezing any trapped air, sort of massaging the dough ball, if it is sticky add a little more flour.
Meanwhile find a kitchen tea towel and lay it out on a flat surface and dust it with half the corn meal, place the dough ball on the middle of the dusted towel, the dust the top of the bread with a little more, fold the towel over on top gently as not to totally trap the soon to expand dough. Set it back into the old bowl with the towel wrapped around it.
Set it in a warm place, room temp. for about 2 hours, or until the dough has doubled in size.
One hour into the waiting process fire up your oven to 425.
Get a sheet pan or if you have a baking stone even better, and put some parchment paper on the sheet pan, sprinkle some corn meal on the stone.
When the dough has doubled in size, remove it from the resting bowl, you will now have the bread in sort of a towel sling. Gently roll it out of the towel onto the sheet pan or stone.
Wait for about 45 to 60 minutes until the crust has become dark golden brown and if you thump the loaf it sounds hollow.
Cook in the oven until your desired doneness.
I like mine about an hour long.
Remove , let cool on a raised wire rack for 20 minutes.
Turn the oven off.
Get some room temperature butter,
slice, butter and enjoy.....
The hardest thing about this recipe is figuring out the time you need to start it so you have the finished product at your desired time......
Enjoy!
Also, I might add. This has worked at both 8500 ft and sea level. It takes a little less time to do the 2nd rise at higher elevation. But still a no brainer!
Note: The picture of the dough in the bowl, is how it will look after 18 hours of fermenting.
Also be sure the water does not have any chlorine in it, with the small amount of yeast being used, it will kill the yeast! ( use non-chlorinated or spring water, bottled or distilled water)
Monday, June 22, 2009
Roasted Rack of Lamb, with basil mustard crust
Never when we have someone invited for dinner, seems like always a couple of weeks later.
I hate twice frozen anything, being spoiled having fresh lamb a lot.This is a very common recipe, but for you who would like another one, and may not have it here it is.
You can add or subtract your own particular favorite spices and herbs
This one I load up with basil and garlic, you could substitute rosemary and thyme for it or add it in.... it is pretty foolproof, especially if you have a instant read thermometer or a remote probe one, otherwise you can tell when there is some juice sizzling in the pan or the meat has folded back a tad.
Once you cook this a few times you will be able to know it is ready by touching and felling the spring back of the meat.
Preheat your oven to 450
One thing to cooking or roasting anything is to be sure it is room temperature before tossing it into your oven. If it is something from your fridge, it is usually around 40 degrees (or at least it better be), when you put it in a hot oven it will not cook correctly no matter what you do, so always let the product come up to room temperature. Don't let it sit there all day, but you don't want to have it too cold.
Wash and dry the rack, If it is already Frenched, then take a knife and slit the membrane on the back between the bones or if you are real handy remove it completely. This lets the herbs and spices flavor the meat better.
Take some two day old bread, toss into the food processor along with a hand full or two of fresh basil leaves and 5 or 6 cloves of garlic, unpeeled.,Put in the salt , pepper and any other seasonings at this point.
Pulse the food processor until the bread crumbs are the consistency you corn meal or something manageable for you.
Coat the rack with your favorite mustard, NOT plain yellow mustard, use some stone ground Dijon or spicy mustard something with a flavor. You don't want the lamb to have the flavor of a ball park hot dog do you?
Ok, maybe you do, but DON'T
After you have put a nice even coating of the mustard sprinkle the bread mixture on the bottom and gently form the bread , pushing as you go until the whole thing is covered in the bread mixture.
Take a little olive oil and lightly sprinkle it on the top so it will brown even better. Put the meat in or on a Pyrex dish or oven proof dish of some sort.
Gently slide it into your hot oven.
Reward yourself with a nice drink.
For rare you will want to look at it somewhere abouts 15 to 17 minutes, Medium rare 18 to 25 minutes, medium 25 to 30 minutes.
Or jab a instant read thermometer into a center portion about half way in. For medium rare you want to see about 135.
Pull it out, tent with some aluminium foil and let rest for at least 8 minutes.
Cut, into servings and enjoy
Stuff you will need:
One 7 or 8 bone rack of lamb.
3 -4 TBS mustard
1 tsp Kosher Salt
1/3 tsp onion power
1 hand full of basil leaves
6 cloves of garlic, skin removed
1/2 tsp coarse ground salt
1-2 TBS olive oil
450 degree oven
plates, knifes, appetite
Thursday, June 11, 2009
Short Ribs Braised with Chile
The flavor actually gets better a day or two after the initial cooking. This recipe can be modified if you like to make the dish more astringent, simply add some apple cider vinegar and a little more sugar, but not too much otherwise it will turn out like a sweet BBQ style.
I like the heat from the chipotles, of you are sensitive to heat, just leave them out!
To Start
Soak the Ancho chile's for 20 minutes in some boiling hot water. Clean by removing the stem and and seeds then coarsely chop. Toss into the food processor the carrots, onions, garlic, tomato paste, chipotle. Quickly pulse 5 or 6 times until you come up with a thick paste.
You may have to add some water to the mix to homogenize. .
Cost the ribs with salt and pepper. Take your dutch oven and put on the stove, crank up the heat and some oil and brown the ribs. Remove and save.
Fry the bacon in the pan you browned the ribs. When the bacon has rendered most of it's fat put in the seasoning paste you just made.
Cook for about 5 minutes then add the rest of the water, cumin, molassess or piloncillo ,salt and pepper.
Now add the seared ribs, Cover and stick into a preheated oven at 325 for about 5 hours..
Remove from heat, let cool on the counter until it is cool enough to put into fridge so that the fat will solidify on top for easy removal. They are better the next day anyway. If you must, go ahead and skim the fat off the top and use the same day.
I usually service this on some exotic rice like jasmine or basmati.
Stuff you will need:
1 large onion chopped
2 carrots chopped
5 garlic cloves chopped
2 tablespoons of chipotles en adobo plus 1 tablespoon of adobo sauce
2 tablespoons tomato paste
2 tablespoons molasses or one piloncillo crushed
1 teaspoon cumin seeds
2 cups of water
2 slices of bacon chopped
1 cinnamon stick
6 pounds of short ribs
Wednesday, June 10, 2009
Sopa De Platano
My wife's staple is Plantain, so this is a soup I made that even I enjoy now and then. As all soups it is pretty easy to make, and after the first serving, you can add stuff to it and have it transform itself into a totally new taste, until you finally run out of it!
Heat your pot, drop in the olive oil and sweat the onions, carrots , celery and garlic until they become a little soft.
Add the chicken stock, the plantain , cumin and your mandatory bay leaf.
Bring to a boil, turn down to a simmer, and let it go for about an hour or until the plaintains are soft.
Remove from heat, let it cool down a little, if you have an immersion blender, you do have an immersion blender don't you?
They are much better and faster than a blender, less to clean and make a great noise while you swirl away inside the pot. OR you can use it as a light saber if there are any kids around.....
Remove the bay leaf, and puree to your desired consistency. Touch up with salt and pepper to your taste and serve with some of the chopped cilantro. If you use a really expensive serving bowls and zigzag some diluted sour cream or creama it will take a whole bunch better........guaranteed!
Stuff you will need:
2 Large Plantains or Platanos machos peeled and cut into 1/2 rounds.
1 TBS olive oil (without Popeye) Anyone younger than 50 will not get that!
1 large carrot , chopped into 1/4 inch dice
1 small yellow onion, chopped fine
1 cup of chopped celery
5 cups of home made chicken stock, remember the lesson a few weeks ago?
1 handful of fresh cilantro chopped fine, try and remove the thicker stems
1 Bay Leaf (remove the Bay leaf just before you blend the whole shebang)
1 tbs cumin
Salt and Pepper
Monday, June 8, 2009
So you want to build a garden box, eh?
Ok you asked for it!
The good thing about raised beds is that even if you have lousey soil, or no soil in some cases like a concrete yard... this will make gardening easy. Especially for old folks who don't want to be on their knees or bed over a lot. I built this box a little higher than you really need so that I would be able to reach all over the place with it. Once you fill it with soil mix, it will provide the excellent drainage needed to grow picture pperfect vegetables and flowers most of the year!
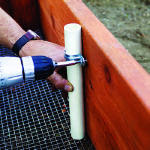
You can build the basic raised bed in a few hours, then add versatility by mounting PVC pipes inside to hold hoops that elevate bird netting, or in colder weather plain old plastic to either start the seedlings early or just cover the crops for better production, sort of like a mini greenhouse.
For best results orient your bed north-south for maximum sun exposure.
It is preferable to use redwood or cedar ― both are beautiful and rot-resistant. But here in Mexico, most likely you can only get Pine, there are some regional woods that also are rot-resitant,so ask your local lumber monger.
You’ll need a table or power saw to cut the wood; after cutting, paint the wood on all sides with an oil-based sealer or stain or left over deck sealer, almost anything will work. I would not use house paint since you don't know what stuff is in that. I chose to paint it a redwood color stain.
The first box I built was only 12 inches high, as shown on the photos. the 2nd one I
doubled it, to be 24 inch high. I personally like the bigger box because I do not have to lean over or ben
d over as much. The downside is that you will use twice as much wood, screws, and soil mix. You can start with the shallow box first and see how you like it, then change it. The construction is simple and you can adjust the size to fit your particular space and requirements.
Have fun!
An electric drill is helpful, though not required.
Stuff you will need:6, 8 foot long 2x6's
1 10ft long 1 inch PVC water pipe
2 10ft long 1/2 ich PVC pipes
1/2 gallon semitransparent exterioir oil stain
32 3 1/2 inch #14 wood screws
16 1/2 inch #8 wood screws
1 roll of 1/4 inch mesh hardware cloth. total of 4x10ft
If you are putting this on top of concrete you do not need the hardware cloth
I used it because I didn't want mole, gophers, rats and other things digging into
the box.
8 1 inch conduit straps
32 cubic feet of soil or mix.
Here you can see one of my boxes with Beets, Carrots, Snow peas and strawberries.
Saturday, June 6, 2009
Carrots Vichy.
I like carrots, and they like me. Here is a picture of some of my crop, the skinny ones are the ones that I have to pull so that the big ones will have room to grow up nice and big , strong and tasty!
This variety are called, Nantes.
Here is a simple recipe. This was one of my most popular items on my catering menu. It is also one that you should learn since it's easy. I usually love to make for formal dinners.
I would suggest that you cut the carrots on the bias, it looks a lot better than just chopped in rounds.
To prep, take the carrots , wash and peel, cut on the bias in about 1/8 inch thickness.
Place the carrots in a 12 inch skillet or saucepan, cover with Vichy or soda water, toss in the salt, cook until tender usually about 5 to 10 minutes depending on the freshness of the carrots.
Drain,
Toss in the butter, toss the carrots over medium heat until all the butter is melted and the carrots are heated through. Then add the sugar, toss, salt and pepper to taste, top with chopped wide leaf parsley...serve.
See I told you it was easy!
Stuff you will need:
About 5 cups yield of carrots peeled and sliced 1/8 thick
Vichy or Soda water
1/2 tsp Kosher Salt
1/4cup butter
2 TBS sugar
1 TBS chopped parsley.
That's it!